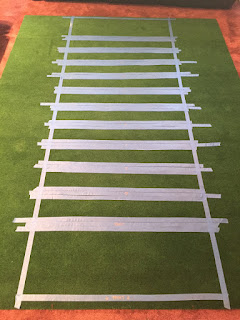
Oh. my. goodness. Y'all, I AM SO EXCITED about this post! I have finally finished my big project for my room and it came out amazing...notice I didn't say perfect, but I've gotten over that (kinda!).
OK, now for the details and you will definitely have to bear-with or utterly-enjoy the math teacher in me. I measured every direction of the carpet I had, found a template I wanted to follow, and then started doing some dividing. Directions by photo to follow and then more detailed instruction at the bottom!
So, there you have it! A fabulous project that shouldn't have taken more than a weekend but took me a week and half trying to do it with any spare 20 minutes a night that I had! If you need more detailed instructions see below where I fully released the math geek! If you have any questions let me know in the comments section and I will do my best to answer ASAP!
 |
| Step 1: Lay out the carpet and measure Welcome to my living room :) |
 |
| Step 2: Mark where you want the lines to be. I used a metallic sharpie so that I could see the lines a little more easily than the black marker showed up. |
  |
~~~~~~~~~~~~~~~~~~~~~~~~~~~~~~~~~~~~~~~~~~~~
Football Field Carpet How-To
Football Field Carpet How-To
Carpet
size: 6-foot by 8-foot
So, being as the endzones are twice the width of the space between
goal lines, I counted there to be 14 sections of equal widths. Being as the carpet
measures 6-ft by 8-ft, I divided the 8-ft in 14 sections, the math comes
out with tons of decimal places, and the math teacher in me wants to tell you
to measure out each section to 6.85714285714286 inches each. But, my ruler
doesn’t use that common denominator, but if yours does more power to ya!
(Insert smirky giggle here!) So, I rounded that off to 6 ¾ inches, because why
not, right? Just kidding…I can’t pass up that mathematical opportunity…check
it:
6.85714285714286 would be 6 and a big nasty fraction, that yes, would go to the 100-trillionth place value…YIKES! But, I just said that the 6.8 was a good enough place to start; so 8/10 (.8) was close enough to ¾ (.75) for all the measuring that would be going on! See, now aren’t you glad you learned all those measurement conversions in school and how to approximate decimal places…hey, I teach math and even I am very grateful for my calculator J
6.85714285714286 would be 6 and a big nasty fraction, that yes, would go to the 100-trillionth place value…YIKES! But, I just said that the 6.8 was a good enough place to start; so 8/10 (.8) was close enough to ¾ (.75) for all the measuring that would be going on! See, now aren’t you glad you learned all those measurement conversions in school and how to approximate decimal places…hey, I teach math and even I am very grateful for my calculator J
So,
now that we’ve decided to measure each section at 6 ¾ inches, lets roll that
carpet out and start marking it. My plan was to use painter’s tape to mark the
lines…but then I remembered I had to actually paint the line and the tape would
be in the way. So, what I did was I marked each measurement with a sharpie on
each side (for straight lines) and then even spaced 2 pieces of painters
tape so I could actually paint the lines! Also, at this point make sure that
you don’t paint an extra stripe in your endzones. Remember, each one is 2 of
the sections we counted in our 14 earlier; in other words, there should be 12
sections that are 6 ¾ inches wide and then the endzones will be 13 ½ inches
wide.


No comments:
Post a Comment