Thursday, July 28, 2016

Outdoor Carpet turned Football Field

Oh. my. goodness. Y'all, I AM SO EXCITED about this post! I have finally finished my big project for my room and it came out amazing...notice I didn't say perfect, but I've gotten over that (kinda!).

Just because I'm so excited, here's the finished photo:


OK, now for the details and  you will definitely have to bear-with or utterly-enjoy the math teacher in me. I measured every direction of the carpet I had, found a template I wanted to follow, and then started doing some dividing. Directions by photo to follow and then more detailed instruction at the bottom!


Step 1: Lay out the carpet and measure
Welcome to my living room :)
Step 2: Mark where you want the lines to be. I used a metallic sharpie so that I could see the lines a little more easily than the black marker showed up.
Step 3: Tape the sidelines so you keep the width consistent when taping the yard lines. I did this because I the painter's tape has a tendency to stray from a straight line and I wanted to keep it as straight as I could.
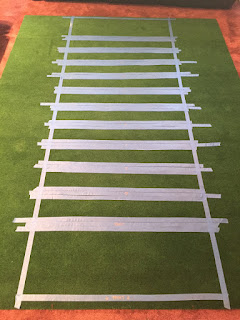
Step 4: Tape all the yard lines. Now, this is when it occurs to you that you have to paint where you put that tape, so keep stretching out that roll of tape (or a wider roll for better coverage) and make a tape line on both sides of the yard line tape.


Step 5: I did this step mostly for you guys, but I don't think you can even see it! On each piece of tape that was to end up being the yard line, I wrote 'Paint' in the middle so I/you would know which piece to remove when you start painting.
Step 6: Head outside! And try to remember to take a picture before you start painting, oh well! Now, at this point you will see I only have the skinny tape and in subsequent photos there's more tape. Well, the story there is that the spray paint wasn't staying well in the lines, even when I would use some styrofoam pieces as walls (you'll see this in a few more pics). 
Step 7: Add all that extra tape and keep painting! And recruit your dad to help!
Step 8: Bring that thing inside from the nasty Houston humidity and remove all the tape! You should have something looking like this! Now, you need to re-tape where you want to paint the sidelines. I lined up one piece of tape on the side edge of each yard line and then left a gap of about an inch and rolled out another piece of tape to section of the sideline. I didn't add extra tape for these, but I had some assistance in painting it this time (Thanks, dad!).
Step 9: Back outside! This where I painted the sidelines, and yes I forgot to take a pic before I painted :) This is the styrofoam I used as a wall for painting. It's the thing stuff designed to be used as insulation for your house. We have all kinds of random stuff laying around the garage, so use whatever you can find!
Step 10: Put that Silhouette Cameo that you love to use! I cut out numbers for my yard lines and taped around them to protect from the spread of spray paint! So I headed out there and did one last round of painting and then I could finally say done!
So, there you have it! A fabulous project that shouldn't have taken more than a weekend but took me a week and half trying to do it with any spare 20 minutes a night that I had! If you need more detailed instructions see below where I fully released the math geek! If you have any questions let me know in the comments section and I will do my best to answer ASAP!

~~~~~~~~~~~~~~~~~~~~~~~~~~~~~~~~~~~~~~~~~~~~

Football Field Carpet How-To

Carpet size: 6-foot by 8-foot

Diagram I used:


So, being as the endzones are twice the width of the space between goal lines, I counted there to be 14 sections of equal widths. Being as the carpet measures 6-ft by 8-ft, I divided the 8-ft in 14 sections, the math comes out with tons of decimal places, and the math teacher in me wants to tell you to measure out each section to 6.85714285714286 inches each. But, my ruler doesn’t use that common denominator, but if yours does more power to ya! (Insert smirky giggle here!) So, I rounded that off to 6 ¾ inches, because why not, right? Just kidding…I can’t pass up that mathematical opportunity…check it:
 6.85714285714286 would be 6 and a big nasty fraction, that yes, would go to the 100-trillionth place value…YIKES! But, I just said that the 6.8 was a good enough place to start; so 8/10 (.8) was close enough to ¾ (.75) for all the measuring that would be going on! See, now aren’t you glad you learned all those measurement conversions in school and how to approximate decimal places…hey, I teach math and even I am very grateful for my calculator J

So, now that we’ve decided to measure each section at 6 ¾ inches, lets roll that carpet out and start marking it. My plan was to use painter’s tape to mark the lines…but then I remembered I had to actually paint the line and the tape would be in the way. So, what I did was I marked each measurement with a sharpie on each side (for straight lines) and then even spaced 2 pieces of painters tape so I could actually paint the lines! Also, at this point make sure that you don’t paint an extra stripe in your endzones. Remember, each one is 2 of the sections we counted in our 14 earlier; in other words, there should be 12 sections that are 6 ¾ inches wide and then the endzones will be 13 ½ inches wide.

Thursday, July 14, 2016

Classroom Project #1!

The Teacher Toolbox

The first project I started was the teacher toolbox, I'm sure you've seen these all over Pinterest and label templates on TpT. I looked at some of the label designs and decided to just make mine own, and just for you guys I'll attach those for you to download and customize if you want. I used backgrounds from different sports: football, baseball, basketball, track, volleyball, and soccer. I bought this tool box at Lowe's and spray painted it red for our school color. In the label template document, you can type in what you want each drawer labeled and print off however many from each sport that you want. I did 5 of each sport for the small drawers (30 of those) and then picked 3 sports for the big drawers (9 of those). I got my sports backgrounds from a Google image search of "sport name + digital scrapbook paper". You can find all kinds of backgrounds just searching for what you want. One tip though, make sure the images are larger than the template boxes so that the pattern won't look grainy or distorted when you print them out.

You can get the template I made here.

Continuing on in the process, I Googled some images of other toolboxes to see what most teachers labeled each of their drawers. I made a list of the most common ones and the ones that would apply to me (yes, I'm that analytical!) and decided on some of them. Being as I opted for the larger toolbox, I had more drawers than the images I saw, so I just decided to leave the extra drawers blank and figure out what else I need once school gets going and I'll go "why didn't I think of that one before"! Next, I printed out all of my labels on cardstock. At this point, some people laminate them but I didn't want to bother. If they fall off, big deal I 'll print another one! But, I did look into how people were attaching them, some used tape, others glue or printing them out on label paper, but I really didn't like any of those options. Which led me to my craft room and I knew exactly what I was looking for...my Xyron!! If you don't have one of these, you need to invest the $20 for it! I LOVE my Xyron, you can turn anything you print out (5 inch width max on my machine...there is a bigger one) and turn it into a sticker! After I printed and cut out each of my labels (cut using my Silhouette Cameo...another great investment) I ran them through  the Xyron and made stickers of each label. I currently have repositionable adhesive in my machine (they also have permanent) but I thought some of my labels may need to be changed to something else later on and I didn't want to deal with sticky residue (hence why I didn't want to use the other methods), so I just stuck with the repositionable. Then I stuck them onto the outside of the drawers and put the drawers back into the case. From start to finish this project took about an hour (not including the time to spray paint and let that dry or design my labels). And I am thrilled with my results! It's my first project of many for my classroom and I wish you success on making your own teacher's toolbox!


The next project I have in mind is creating a football field for my room. Yes, I am putting a football field in my room! And I am totally excited about it. And I'm still considering making a baseball field to switch out in the Spring! We'll see, that's a few days from now :)

Football field will be up in a couple days...hopefully! We run a busy life around here!

Leave any questions or comments below and I will try to answer and respond to each of you!

Tuesday, July 12, 2016

Decisions, decisions: Your classroom theme!

Decisions, decisions....
Of course, the decorating of the classroom is probably one of the most fun things we do each school year that brings us so much joy and the true crafter out of each of us. With that comes all the hours upon hours spent reading articles on Pinterest, pinning them and trying to decide what theme will work for this year's kids, or make your room look the cutest, or help you win the cutest classroom contest (it may not be official, but you know everyone will be talking about it!).

So, after various themes floating through my head and the artistic waves of craftiness and I landed at my decision: college sports!

And there is some back story to this decision, the pics will be in a later post. I'll post a link once it's up for you guys to skip my silly story, here.

So, for those who want to know the story: in our high schools we have a program called Project Graduation that is put on each year for the senior class. The program was developed to keep youth away from drugs, alcohol, and everything else that they could potentially get into trouble with. Well, the year I was a senior the lovely moms in charge made a college pennant for each school that someone in our graduating class was accepted to. Well, a few years later it was my younger brother's turn to graduate and there just wasn't as much parent involvement as there had been in the past. So the powers that be decided to rent out a local party place (Main Event for those who have one) and so they didn't need to decorate a lot. Well, being the family that never says "no" that we are, we got volunteered ("stuck") with cleaning out the storage unit. Well, I came upon a box of all those pennants and had a small idea that maybe one day I could use it in my classroom or school. Which is where the plan to have a college sports theme came from. Not to mention, my love for the LSU Tigers! Geaux Tigers!

That brings us to the decorating part, I have some craft ideas dancing around in my head and my next few posts will definitely let you know what I've come up with!

Friday, July 8, 2016

New Hired Teacher Thoughts

Ahhhh! I got a job, at the school I wanted, teaching what I wanted to teach!! Yay!!

So of course we do a little happy dance! Go shorty, go go go, go shorty!


Days and weeks of excitement ensue...then one day, a thought pops into your head: "What if my kids don't like me?" and then here come all those other questions, "What if I'm a bad teacher?", "What if my kids fail the first test?", "What if my kids fail every test?", "How do I know what to teach them and how to get it best across to them?", and on and on. And so you are now as worried as you are excited. And you get text messages from your friends that look like the one below and you feel a little better because they are having the same thoughts!
(Side note, yes her name is Jessica and my name is Jessica.
We don't get confused, just everyone around us!)
BUT, you stop for a moment and remind yourself that you wouldn't have survived student teaching if you weren't good at teaching; you wouldn't have gotten the exact job you wanted if they didn't believe in you and that God wouldn't have given you the opportunity if it wasn't the place He wanted you to be! And you're happy again! Pheww, thank goodness that's over!


So, to all my other brand new teacher friends:


Are you worried? Excited? Nervous? Frantic?

And for my southern friends:


 Feel like a chicken with your head cut off? A fish out of water? A sheep without a shepherd?

All I have to say is Let Go and Let God! If you weren't supposed to be where you are, you wouldn't be. If you weren't supposed to be a teacher, you wouldn't be. And if you weren't going to be the best YOU that YOU can be, God would have steered you in a different direction. So, let's all just take a breather for the next week or two, because once August hits, you can bet you won't even have the time for the evil thoughts to break through!


He caused the storm to be still, so that the waves of the sea were hushed. Then they were glad because they were quiet, so He guided them to their desired haven.
~ Psalm 107:29-30 ~

~~~~~~~~~~~~~~~~~~~~~~~~~~~~~~~~~~~~~~

Have any questions or feelings you want to add as a brand new teacher? Or any advice from the veterans to help us rookies feel ok?! Let me in the comments below!